I always wanted to post these pongal kolams in my blog.But I am not very good in putting kolams.Today when I searched the net for the kolam, I found this very useful blog from visalakshi.I would link this in my blog for the sake of my readers.
↧
A link to Nadu veettu kolam
↧
Thengai Paal Kanji (porridge with coconut milk)
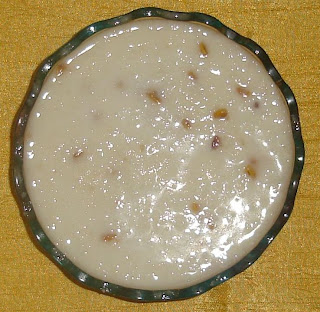
I am sure this will be an item familiar to all Tamilians. This kanji is an excellent home remedy for ulcer in the mouth,tongue or stomach.The healing effect of coconut and fenugreek does the wonder. All of us one day or the other will be suffering from the mouth ulcer and find this kanji very useful..For the bachelors who have food outside the whole week can have this on the week end to soothe the stomach. Paruppu thuvayal or Vendakkai pachadi will be an excellent combination.
Ingredients
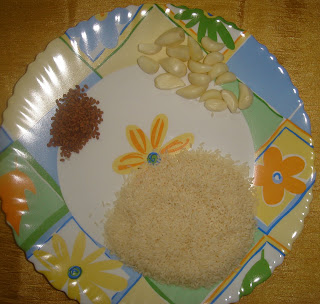
Raw rice or Rice that you cook -1/2 cup
Garlic pods-10
Fenugreek seed -1 ½ teaspoon

Coconut milk –milk taken from a small coconut or ½ cup thick tinned coconut milk
Procedure
Pressure cook the rice along with the garlic pods and fenugreek seeds adding quarter cup coconut milk and 2 cups water.In slow flame cook the rice for 12 minutes.Open the cooker and smash the rice with a ladle adding little salt.remember this kanji does not need much salt. Now add nearly 2 cups of coconut milk.Add water to the tinned milk to make it two cups if tinned coconut milk is used. Serve immediately as the porridge will become thick once it cools .If you are going to use it later and find it very thick little more coconut milk or warm water can be used.
↧
↧
Rava Uppuma (Kichadi)

Almost all households in South India (I am not sure about the other parts) would have resorted to this item though they like it or not and whether they are good in preparing it or not.This is mainly because of the less cooking time that it takes and can easily become a complete meal. We have seen in many functions if they run out of food due to excess crowd the cooks will make this uppuma and serve fast.Rava is not easily digestible and so cant become a regular tiffin.Many I come to know find it difficult to make it perfect.I too was not able to reach the best combination of oil,water etc for many years. This is a food item best suited for bachelors. Youngsters will not have digestion problem and they can resort to it as an instant food.Many people I know love this uppuma .In some places they call this rava Bombay Rava.
I am crazy about this uppuma and will ask for it in all hotels. My children are not big fans of this and I rarely prepare this at home .This is a very tasty recipe and if followed exactly will give a nice uppuma.This uppuma can be made without vegetables also.If you add vegetables you can make the item more healthy. Those who are having frozen mixed vegetables can easily add a handful.The main thing to be kept in mind while making any uppuma is that you should not be very cautious about the quantity of oil used. If you are so then the uppuma will turn very bad like kali.
Ingredients
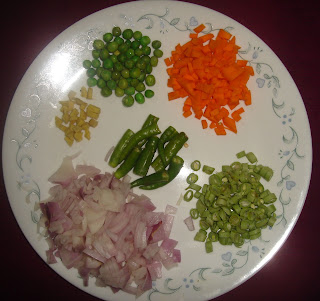
Roasted Rava -1 cup (Now all the brands of Rava we get are roasted)
Onion -1
Green chili-4
Curry leaf-little
chopped ginger- 1 teaspoon
Coriander leaf -little
Cooking oil -4 table spoons (If mixed with ghee will be very tasty)
Vegetables
cut beans-3 table spoons
carrot sliced- 3 to 4 table spoons
peas -little
(If fresh vegetables are used microwave it for 4 minutes or cook separately for 10 minutes.)
To Season
Mustard seed-1 teaspoon
Broken urudh dhal-1 teaspoon
Kadalai Paruppu- 2 teaspoons
Broken cashews -1 table spoon (optional)
curry leaf-little
Procedure
Place a reasonably big kadai in the stove.Add 3 table spoons of cooking oil.If you like you can mix a tablespoon of ghee.Season the uppuma with the items given in to season.First add kadalai paruppu when its color changes add mustard seed then urudh dhal and then curry leaf.Now add the chopped onions and slit chilies. Add the cooked vegetables also if vegetables are used.1:3 is the ratio of water to rava. So add three cups of water and the salt needed now.Close the kadai so that the water boils fast.once the water boils add the rava equally in all sides of the kadai(In Tamil we call it thoovurathu).Sir nicely till it becomes semi solid.Now reduce the fire. Add 1 table spoon more of ghee or oil to the corners of the uppuma in the kadai and continuously stir from top to bottom even though it gets the correct consistency for 5 to 7 minutes in medium or slow fire.Rava needs this cooking time.If you switch off once it gets thick then the rava will be left uncooked.The uppuma will not catch to the bottom if oil is exact.After 8 minutes switch off the stove and add the coriander leaves if you have and serve.
↧
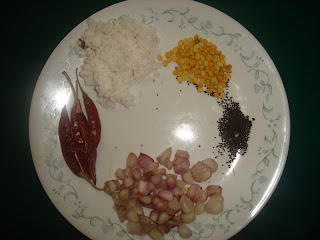
Parangikkai Puli Kuzhambu (Yellow pumpkin gravy with tamarind)

This gravy will be mouth watering for those who love the combination of hot, sour, sweet and salt taste. This gravy is mainly prepared when there is a mass gathering like temple function or free Anna dhans. I think the reason behind is that a whole pumpkin will give lot of cut pieces needed for the crowd. Moreover pumpkin is reasonably cheaper than other vegetables. I don’t find any other reason. If anybody know any other reason can let me know.
This is a veg normally harvested during pongal season and will be very cheap that time. In our community it is a must item to be cooked on Mattu Pongal day. One thing to be remembered by the youngsters is that the pumpkin has to be cut along with the outer skin. The skin should not be peeled off.

Ingredients
Pumpkin pieces-1 cup
Small onions-20
Garlic pods-20
Tamarind –a small lemon size
Tomato-1
Curry leaf-little
Gingerly oil-3 table spoons

Kuzhambu milagai Thool-2 table spoons
Coriander powder-1 table spoon
Turmeric powder-1 teaspoon
Jaggerry-A small piece
Procedure
Keep the kadai in the stove. In three tablespoons of gingelly oil season the gravy with a teaspoon of fenugreek and fennel seed each. Add curry leaf also. Now add garlic pods.Wait for it to turn color. Now add onions and then tomatoes and parangikkai pieces. Once they are sauteed add milagai thool, coriander powder and turmeric powder keeping the flame low. Add the tamarind and salt dissolved in three cups of water. Close the kadai. Let the gravy cook in slow fire for 15 minutes. Once you see oil on sides of the gravy add the jiggerry. Increase the flame. Cook for 5 more minutes and switch off the stove. Serve after 2 to 3 hours for great taste.
↧
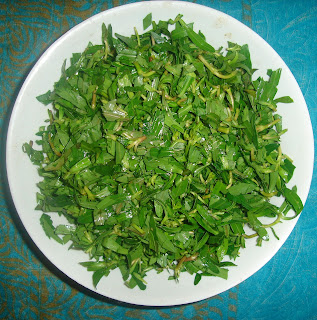
Arai Kerrai Poriyal (greens curry)

All of us are in the look out for good keerai recipes to impress our children as we find it difficult to give them. We all know its nutritional value and its importance in our menu. If this poriyal is prepared with care,I fee it can be given to children without much difficulty. we have to be changing the recipes often so that they don’t feel that they are being given the greens often. I find it difficult with my elder one in giving her keerai even now. It is time that she should have started giving it to her son.
The same poriyal can be prepared with other keerai like mulai keerai sirukeerai etc.Try out with the greens you get in your region and update.
Ingredients
Keerai- 1 bunch (cleaned,cut and washed) -4 cups
Chopped onion-1/4 cup
Red chilies-4
Grated coconut-2 tablespoons

To season
Mustard seed-1 teaspoon
Kadalai paruppu-2 tablespoons (optional)
Procedure
Keep the kadai in the stove.Season the poriyal with the items given in to season. Add red chilies and then onion.now add the greens and stir. In a few minutes it will become small in quantity. There will be water in itself enough for cooking else sprinkle some water.Make the flame low.Close the kadai.Check after 5 minutes. Add the salt needed. Once you feel the green is cooked and the water content has gone add the grated coconut and switch off the stove.Serve hot to children .This can mixed with rice along with little ghee and fed to small ones.
↧
↧
Ponnanganni Keerai Koottu

This is a green with innumerable medicinal effects and at the same time can be cooked with good taste. Pon agum kaan nee is the one word which includes all the benefits of this keerai. If taken regularly the body will glow like gold is what is believed.
For the sake of my readers I have browsed and found some benefits of this green.
There are two varieties of this keerai – local and ‘foreign’. Native variety is a super green plant. In Tamil we call the foreign one as seema ponnanganni. All of us would have seen that little bushy pink plant in parks and gardens planted as borders.
Uses
The word ‘Pon’ is the vernacular name of the plant ( Ponnanganni) means ‘gold’. This plant is thus as valuable as gold. Fried in ghee with a little pepper, salt and taken for 48 days it promotes the beauty of the body, imparts a golden glow, cools the eyes.
Lean people can gain weight and strength by eating this green leaves, cooked with Thoorr dhal, and ghee.
Regular intake of this green thrice a week increases production of breast milk in lactating mothers.
It improves the function of the liver.
If eaten with white garlic, Ponnanganni cures chronic constipation. Piles also can be cured.
Some people have ‘hot’ body. Such people can take two ounces juice of this plant mixed with 4 ounces of goat or cow’s milk. The body then gains strength.
Ponnanganni juice 30 ml mixed with goat’s milk (30 ml) may be taken empty stomach early morning. This reduces body heat and nourishes the body. If goats milk is not available, use cow’s milk.
Ponnanganni in any form – food or Thailam is good for the eyes.

This keerai can be made a poriyal like aria keerai or can be made in koottu form. Thoor dhal will be good for this green.
Ingredients
Ponnanganni keerai – 3 cups cut
Chopped onion-1
Sambar powder-1 ½ teaspoon
Very small tomato-1
Garlic pods-4
Thoor dhal- 3 to 4 table spoons
Procedure
In a small cooker pressure cook the dhal. Once cooked open the cooker add the green ,onion, sambar powder and the tomato into the cooker itself. Mix well. No need to add more water.Close the cooker and cook for 5 minutes or for one whistle in medium fire, After the pressure releases open the cooker and add the salt needed .season the koottu with a teaspoon of mustard and small jeera. Cook for 5 more minutes without lid. This green needs to be cooked very soft. So pressure cooking will make the job very easy.
↧
Thayir Bonda or Thayir Vadai (Curd Bonda)
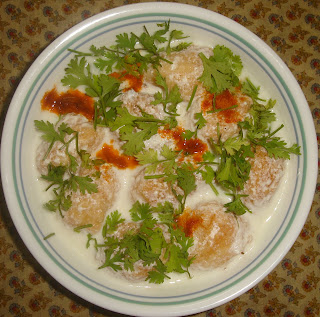
All Indians would have certainly tasted thayir vadai, the traditional vadai soaked in Curd. This bonda soaked in curd is little different . I prefer this to thayir vadai since there is no seasoning and no onions added .For the youngsters it is a very easy item as they need not flatten the vadai with a whole in the middle It is false proof too. The main thing to be taken care of for the dish turning perfect is the small tips to be followed. If you are going to make all the vadai or bonda and going to soak it in curd for hours and serve then the vadai is going to be soggy. So follow the blog exact to get good results
Ingredients
Urudh dhal -1 cup (It gives 30 bondas to the size shown in snap) In a party can be served to 10 people.
Green chili-1
Salt to taste
Oil to fry
Curd whipped with salt -3 cups (keep some curd extra)
Red chili powder- 1 table spoon
Coriander leaves for garnishing
Omam powder -1 table spoon (optional)
Procedure
Soak the dhal for 30 minutes. Don't soak more else there is a chance of bonda becoming oily. grind it the way you grind vada batter. Tip to the new ones grind it adding less than ¼ cup water. Excess water will make the bonda oily and also difficult to drop in oil. So use the minimum water. Since you are not using much water to grind check the grinder often and mix well. In between add the chili and salt needed too.
Add ½ litre oil in a kadai and heat.once the oil is hot keep the flame in medium. Take little batter in your hand and try to somewhat make it round between your fingers and drop in oil. If you don’t make it round also no problem. It will automatically form like bondas.If the bondas stick to each other also don’t worry .It can be separated once fried.Turn sides and fry golden brown with the flame high. Take the bondas and keep it in a tissue paper to absorb excess oil.

Keep the curd whipped along with salt also ready.If you are going to serve in a party,then when you are going to serve keep the required cups and place bondas in it. Add the curd to immerse the bondas in curd to all cups. Now sprinkle red chili powder and omam powder on top. Finally garnish with coriander leaves.
Important thing to be noted is that the bondas should not be allowed to soak in curd for more than 10 minutes.since there is no seasoning or onions children will love it.
To my surprise my younger one waited for me to take the snap and finished the cup. She is not a big fan of thayir vadai
↧
Chettinad Milagu Kozhi Kuzhambu (Chettinad Pepper Chicken Gravy)
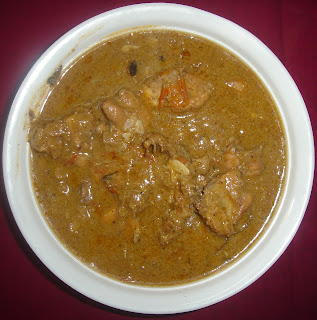
Chettinad is famous for spicy non-veg items. These pepper gravies of chicken or lamb are specially made during the mass prayer to the ancestors which we call padappu.To serve the big crowd the gravy will be little watery but the taste can’t match the carefully made gravy made at home. In the padappu they use only pepper for hot taste. But for the small quantity we make at home, I feel that little chili powder should be added .I recommend the use of a glass of coconut milk also since the chicken and pepper are hot and especially during summer coconut milk will compensate little bit of heat. This preparation which I have blogged is one of our favorite item in a mess in our town. I personally met the old woman who cooks this in the mess, a member of the family who runs the mess and got the recipe. My elder daughter also loves this gravy and wanted me to blog it today itself so that she can serve it in my grandson Siddarth’s Birthday party tomorrow. He is turning two today.

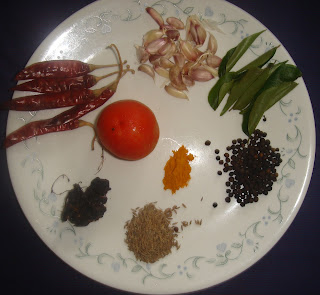
Ingredients
Chicken -3/4 kg
Big onion chopped -2 cups
Tomato-2
Garlic-10 pods
Ginger garlic paste-1 table spoon
Curry leaves-little
Red chili powder-1 table spoon
Pepper fennel powder- 2 table spoons (keep some powder extra so as to add according to taste)
Coriander powder – 1 table spoon
Coconut milk thick- 1 cup

To season
Cinamon-3 small pieces
Bay leaf-1 small one
Clove-3
Pepper fennel powder
Take 4 table spoons of pepper and two table spoons of fennel seed (perungeerakam).Powder it well and store in a container. Use the required amount.
Procedure
Marinate the chicken pieces with the 1 table spoon chili powder and little salt and marinate for an hour.
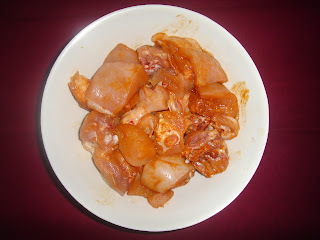 Keep the kadai in the stove. In three to four table spoons of oil season the gravy with the items given in ’to season’. Add the garlic pods first. When it turns golden brown, add the ginger garlic paste, chopped onion and sauté well. Then add the tomatoes.Saute well till the tomato pieces are soft. Now add chicken pieces.Saute well till water oozes out from the chicken.Then add the coriander powder and half of the pepper fennel powder and sauté well.Close the kadai checking in between that there is water in the gravy. If there is no water to cook, mix 1 cup of water to ½ cup coconut milk and add. Cook for 15 minutes in low fire .This cooking time absolutely depends on the quality of chicken you use. In US I have found the chicken getting cooked very fast.But here in India it takes pretty long time to cook in an open kadai. When you feel the chicken is almost cooked add the remaining pepper powder and the salt needed too. Always be careful while adding the pepper powder. Be sure that you don’t make it very spicy. So use your required quantity. Cook for 5 minutes. Now add the remaining ½ cup thick coconut milk and cook for 3 minutes. If you want the gravy to be little watery add 1 or ½ cup water to the coconut milk. Today as a whole I used 1 cup milk adding 1 cup water.
↧
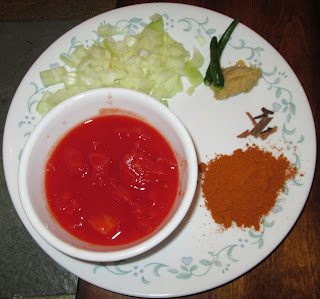
Instant Rasam (Quick Tomato Rasam)

I have already blogged 2 recipes of rasam. Now a days I stick to this recipe because its a very easy, fast and tasty preparation. Bachelors who come home tired and want to have something hot and tasty very fast can have this along with chips. Even my younger one is able to prepare this in no time with almost good taste. I want my readers to try it once and get back with comments.
Ingredients
Tomato -1 (if you use a bigger one reduce the tamarind used)
Red chili-2 (1 for grinding and one for seasoning) I have shown 4 but use just 2
Garlic-7 pods
 Pepper corns-1 ½ teaspoons
Small jeera-1 ½ teaspoons
Tamarind-little
Turmeric powder-1/2 teaspoon
Curry leaves &coriander leaves-little
Jaggerry –a small piece (totally optional) Try with and without and find out your taste
Procedure
In the medium jar of the mixie grind the tomato, pepper corn,jeera,garlic,1 red chili and turmeric powder. Run the mixie for a minute. In 3 cups of water add the salt required along with the tamarind and keep ready.
Keep the kadai in the stove. In a teaspoon or two of cooking oil season the rasam with a teaspoon of mustard seed ,small jeera and little curry leaves. Pour the grinded mix into the kadai. Keep the stove in medium and sauté till you get a nice flavor. Now add the tamarind salt water and bring rasam to a nice boil (boil for atleast 3 minutes). Jaggerry if used can be added now and cook for a minute.Check for the salt and hot taste. If found anything less, little pepper jeera powder or salt can be added. Switch off and garnish with coriander leaves if you have
↧
↧
Pala Kottai Poriyal (Jack Fruit Seed Fry )

This recipe is for those living in rural areas where jack fruits are abundant. In kerala and in Neyveli it is very common. So I am used to good preparations out of this seed. Palakottai murungakkai kuzhambu also will be very tasty. Little bit of patience is needed to cook this as we have to take of the outer white skin first.Cut it into two halves, then it will be easy to peel off the white skin. This seed is said to be little gastric. So avoid taking it too much. But this fry is very tasty and will go well with sambar, rasam and curd rice

Ingredients
Palakottai-30
Sambar powder-2 teaspoons
Turmeric powder-1/2 teaspoon
Procedure
Pressure cook the kottai with half cup water and little salt for 5 minutes. Open the cooker ,I f you have time peel off the brown skin too. Keep the kadai in the stove. In a teaspoon of oil,season the fry with little mustard seed. Add the chili powder and salt needed to the cooked kottai and put it in to the kadai. Fry everything together for 6 to 7 minutes without adding water
↧
Mangai Vellam Pachadi (Mango with jaggerry sauce)

It is mango season and it is a mega time for the mango lovers. This vella pachadi out of mango will be made on Tamil New year day to bring out the sour and sweet taste in lunch. People who love this will be really crazy of this dish. This time when I went to Chettinad, I tasted this almost everyday since this was prepared in my periamma’s house or in our house each day. Here I want to mention about the houses in Chettinad for the knowledge of others. Houses there will be very big running to the whole of a street .My home especially in Kanadukathan is very big. The front side of the house is one street and the backside another street .Those who are interested in seeing chettinad houses can have a view of my home by clicking this link http://chettinadumansion.com/. Part of the house is converted into a heritage home and is taken care of or rather managed by my father and brother. Coming back to vella pachadi, when we go home for holidays to chettinad it will be real treat, since we will have lot of items during lunch, dinner or breakfast. The houses will be big and will be shared by grandfathers brothers and hence so by dads brothers too. Each family will have a kitchen and whenever anybody living outside from anyone of the family comes to the house all will get excited and will try to prepare something special. So food will be shared between all kitchens and all will have lot of items. But now a days people living in Chettinad are few and hence in our house too we have only my dad’s elder brothers family there. I have already mentioned about my periamma living there almost 78 years, but still very active cooking her own food since all her children are outside. She is very good in cooking like my mom and now she is very enthusiastic in sharing her rare recipes with me .she is very happy that my blog is very useful for her grand daughters.
This vella pachadi will be loved by those who like sweet taste with rice. To be frank, none in my family is a big fan of this and that is why I did not blog this recipe though requested by many readers. My mom prepared this especially for blogging and showed me how to cook this.
Ingredients
Mango -1 (peel off the skin and make it into thin slices)
Jaggerry-100 to 150 gms (according to taste)
Pasi paruppu -4 table spoons (roast a little before cooking the dhal)
Green chili-1or2
Turmeric powder-1/2 teaspoon
For seasoning
Mustard seed-1 teaspoon
Curry leaf-little
Red chili-1
Procedure
Pressure cook the dhal and keep aside.
Pressure cook the mango pieces adding half cup water (use the minimum water needed ) along with the green chili, little salt and turmeric powder.
Remember the dish is sweet so don’t use too much salt.
Pressure cook for 5 to 6 minutes. Open the cooker. Add the cooked dhal also.
Now add the jaggerry checking in between for correct sweet taste
Cook for 3 to 4 minutes smashing everything together with a ladle.
Finally season the pachadi with the items given in ‘to season’
The question in everybody’s mind now is why can’t we cook the dhal and mango together. I will tell you the reason. Roasted dhal itsef will take little long time to cook. Next point is that dhal will not get cooked fast with anything sour.
↧
Podimas with Soy Chunks (Vegetarian version of Mutton Podimas )

This soy chunks used is precooked I guess with salt,garlic and chili.I tasted it before cooking and found all tastes in small quantities.So we should be careful while adding salt and hot taste while cooking.It is soy chunks cooked and crushed.

Ingredients
Onion- one (minced)
Green chili-2
Tomato puree -1/2 cup (I used Hunts crushed tomatoes)
Ginger garlic paste- 1 teaspoon
Red chili powder- 1 table spoon (use as per your requirement)
Garam masala powder-1/2 teaspoon (optional)
Kadalai paruppu (channa dhal) -3 table spoons (¾ cooked) cook it for 10 minutes in a kadai or pressure cook for one sound or 6 minutes
For seasoning
Cinnamon-2 small pieces
Clove-2
Bay leaf-small piece
Fennel seeds-1 teaspoon (many wont like this taste but this should be added to all non veg since it helps in digestion)
Curry leaf-little
Procedure
Keep the frozen packet out for 3 to 4 hours till it comes to room temperature.Those who go for work can keep it in the regular fridge in the morning if they cook in the evening or at night if cooked in the morning.
Keep the kadai in the stove.In one table spoon of oil season the curry with items given in ‘for seasoning’.Now add the minced onion and green chili and sauté well . Add ginger garlic paste and mix well .Now add the garam masala powder and chili powder and the salt required. Remember the soy chunks already contains some salt taste. Saute well. Add the soy chunks and mix well and cook for 5 to 6 minutes with the kadai closed in slow fire. Now open the kadai and add the tomato puree and cook with the lid open till all water content disappears and try to roast it in slow fire to the desired consistency. If you want the dry version add the cooked channa dhal and mix well. If you want to use it for chappathi then don’t dry roast it. If it is for chappathi switch off little early that is sometime after adding tomato puree. Those who don’t mind adding an egg can add it to the dry version.It will increase the taste.
Try this recipe and find out different recipes out of this. I found it being used along with vegetables in noodles and tasted similar to chicken.
People living in other countries please wait,I will find a method to cook this with the regular soy balls available
People living in other countries please wait,I will find a method to cook this with the regular soy balls available
↧
Kaadai Masala (Chettinad style) Quail roast


curd-2 table spoons
chili powder-1 table spoon
coriander powder-1 table spoon
Turmeric powder-1 teaspoon
garam masala-1/2 teaspoon
pepper powder-1 teaspoon
ginger garlic paste-1 teaspoon
ginger garlic paste-1 teaspoon

Ingredients for the masala
small onions -20 minced
garlic minced-2 table spoons
tomatoes minced-2
chili powder-1 table spoon
ginger garlic paste-1 teaspoon
coconut milk-1/4 cup (optional)
Seasoning
fennel seeds-1teaspoon
bay leaf-small piece
cinamon-2 small pieces
curry leaf-little
Procedure
Wash the kaadai nicely .Cut the hutch back of the kaadai.Make small slits all through.Mix all the items mentioned in for 'marination 'in the curd and apply on the quails nicely and marinate for an hour.Non stick kadai will be good to cook this if you have else no problem. Keep the kadai in the stove.In two table spoons of cooking oil season the masala with the items given for seasoning.Now add the garlic pieces and saute for a minute.add the ginger garlic paste and saute well.now add the minced onion along with little salt and saute till they become translucent. Add the tomato minced and mix well.The chili powder can be added now.mix everything well.Add the kaadai pieces and stir nicely so that the masala gets coated in the pieces.cook for 5 minutes in medium fire with the lid closed.After 5 minutes open the kadai and add the coconut milk or water 1/4 cup .I recommend coconut milk since it will take care of the heat of this meat.Now close the kadai and cook for 10 minutes in medium flame.Now check that the meat is cooked. If not close the kadai and cook for some more time. Add little water if it is dry.Once you find the meat is cooked open the kadai and raise the flame a little and fry till the masala becomes thick.switch off the stove .Transfer it into a plate and coat the pieces with the masala left in the kadai.let the quails absorb the masala till it is served.
↧
↧
Thakkali Soup (Tomato clear Soup )
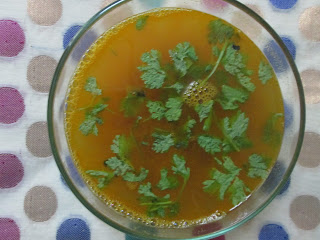
we are almost on the look out for some good soup recipes, since soup is an indispensable item in all households .This is a simple soup which can be given even to small babies This soup can be had with rice also if made little hot and spicy.For bachelors this is a good recipe as it is simple and can serve dual purpose.This soup will go well along with papad for rice.

Ingredients
Tomatoes-2 (big)
Big onion-1
green chili-2
Broken green gram (pasi paruppu)-2 table spoons
Thoor dhal(thuvaram paruppu)-2 table spoons
Turmeric powder-1 teaspoon
Pepper powder-1 teaspoon

Pepper-1 teaspoon
clove-2
fennel seeds-1teaspoon(big jeera)
cinamon-2 small pieces
bay leaf-1 small piece
Curry leaf-little
Coriander leaves for garnishing
Cut the tomatoes into fine pieces. Mince the onions too.Slit the chilies.In a small pressure cooker add little cooking oil and season the soup with the items given for seasoning.Now add the dhals and saute for 30 seconds so that its raw smell goes(if you roast for long then the dhals will get roasted and will not get cooked.so be careful) now add the tomatoes and onion pieces along with the green chili.Add turmeric powder and the salt needed.Pour 2 to 3 cups of water.Close the cooker and cook for 7 minutes or for 2 whistles.Once the pressure goes open the cooker and pour the contents into a stainless steel strainer or any good strainer.Squeeze off the contents nicely with a laddle.Now add as much water or Arisi mandi(rice washed water) to get the desired consistency.Check for the hot and salt taste.If you are going to have it as soup for drinking then the salt and hot taste can be less.Keep the cooker again in the stove.Now add the pepper powder and without closing the cooker bring the soup to a boil or cook for 5 more minutes in medium flame.Garnish with finely chopped coriander leaves while serving.
↧
Cauliflower Masala (Gobi masala)

All vegetarians have to be satisfied with some specials made out of this veg when the non veg lovers treat themselves with chicken or mutton.Good spicy dishes can be made out of this.Cauliflower will attract worms and so should be boiled with a pinch of salt first. This vegetable is known to be gassy and should be avoided by new and lactating moms.
This recipe is a very easy and tasty one.It goes well with the soup rice which I blogged yesterday (Thakkali Soup).It will be excellent with curd rice also and will hardly take 10 to 15 minutes to cook.
Ingredients
Cauliflower- broken florets(20)
Tomato Big-1
Big onion-1
kuzhambu milagai thool-1 tablespoon or red chili powder-3/4 tablespoon
Turmeric powder-1 teaspoon
Ginger garlic paste-1 teaspoon (optional)

To season
Cinnamon-2 small pieces
Bay leaf-small piece
cloves-2
Fennel seeds-1 teaspoon
Curry leaf-little
Procedure
Boil the cauliflower florets nicely for 5 minutes along with a pinch of salt.Mince the onion and tomatoes.In a kadai add 1 table spoon of cooking oil and season the curry with the items given for seasoning.Now add the onion minced along with a pinch of salt and saute till the onions become translucent.Now add the minced tomato pieces and saute will smashing the tomatoes with the ladle When the tomatoes Get smashed add the milagai thool and turmeric powder along with the salt needed.Mix well.Now add the boiled cauliflower florets and mix well so that all the florets get coated with the masala. Cook for 5 minutes like that.Now sprinkle a handful of water and close the kadai keeping the flame in medium.After 5 minutes check for the taste and see to it that the pieces are well cooked .If not cook for few more minutes else increase the flame and mix everything well and see to it that there is not much water content.When the oil separates switch off the stove.If desired you can garnish with coriander leaves .
↧
Vazhai Poo Murungai Keerai Thuvattal ( Banana flower and Drum stick leaf fry)


This flower is known to increase progesterone levels and there by reduce blood flow
during mensuration.
It is a good source of Vitamin A &C
Known to be a good lactating agent and hence good for feeding mothers
Good for heart patients and for patients suffering from stroke,

Ingredients
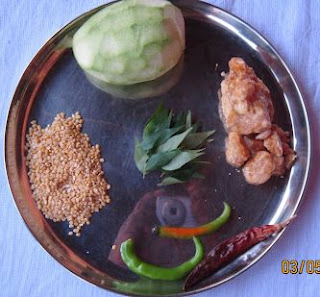
Banana flower -1 (cleaned and minced)
Murungai keerai-2 hand fulls (It is totally optional. Murungai keerai goes excellent with vazhai poo)
Small onion-15 minced or big onion-1 (minced)
Green chili-4
Red chili-1
Grated coconut -2 table spoons
Turmeric powder-1 teaspoon

Mustard seeds-1 teaspoon
Urudh dhal-1 teaspoon
Cumin seeds-1 teaspoon
Channa dhal-2 teaspoons

Procedure
Clean the flower by taking out the part shown in the snap
Mince nicely.
Pressure cook the minced flower in a cooker adding a cup of water and turmeric powder with little salt for 1 whistle or 5 minutes.
keep the murungai keerai ready (only leaves).It is optional.
Once the pressure goes open the cooker.Strain the excess water.
Keep the kadai in the stove.In one table spoon of oil season the fry with the item given for seasoning.
Add the chillies and minced onion and saute for 2 minutes.
Now add the cooked banana flower.
Add the salt needed too.Remember u have added little salt while cooking the flower.
Cook for 2 minutes mixing nicely
If you have murungai keerai,add now.
Cook in slow fire closing the kadai now and then for 5 minutes so that the keerai gets cooked.
Finally add the grated coconut and mix nicely
Before switching off check for the salt taste.if needed sprinkle some and mix nicely.
This fry goes well with rasam as well as curd rice.
↧
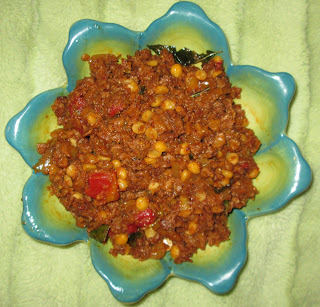
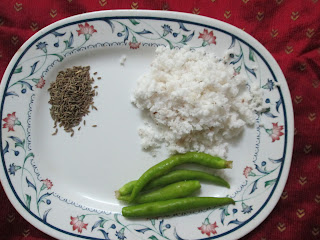
Kothavarangai Pachadi (cluster Beans Curry )

It is one of the abundantly available vegetable in South India since it is very easy to grow and the plant does not need too much care.The harvest also will be in plenty as the name suggests it will be grow in clusters.A single plant itself will yield a lot of beans.Though it is abundant it will not find a place in the menu of many households.There may be many reasons for that.whatever it may be I know that it tickles the taste buds of many if properly cooked.My husbands loves this gravy. This recipe is dedicated to those fans of cluster beans.
Ingredients

Kothavarangai -1/4 kg
Small onion minced -10
Tomato -small 1
Thoor dhal-3 table spoons
Sambar powder-1 table spoon
Tamarind -half the quantity used for sambar
Procedure
Cut the vegetable as shown in the snap.Cook the thoor dhal in a small cooker.In a pan season the pachadi with a teaspoon of mustard seeds and cumin seeds and little curry leaf.Saute the minced onion and tomato.Now add the kothavarangai and saute in medium fire for 3 to 5 minute. This will remove the little bitter taste the veg has. Now transfer this into the cooker with thoor dhal .Add the sambar powder,turmeric powder,salt and tamarind.The curry should now look as if all the vegetables are inside the dhal.If not add little water. Adding tamarind now will help the vegetable not to be over cooked.Close the cooker and cook for 2 whistles or for 6 minutes in medium fire.Garnish with coriander leaves while serving.
↧
↧
Vellai poosanikkai Koottu or Kalyana poosanikkai curry

There are innumerable health benefits for this vegetable. But memories about this recipe runs back to my college days.I was doing my master of Economics in Kerala that time.I have a friend called Lakshmi who studied with me from Ist grade.We used to have exams in the month of April-May in college .Since we lived in Factory quarters allotted mainly for managerial category,I have to come to the nearby town Perumbavoor to meet my friends and of course my best friend Lakshmi.My mother used to drop me in the morning in her house and we will do combined study and will have lunch in her house and return back home in the evening.Lakshmi's mother was a music teacher and since it was holiday time for school kids she will have music classes till 12.As is the case ever we will be hungry all the time when we have to study.So we will be waiting for that 12'o clock so that she will start cooking. She will come and sit near us with a poosanikkai or big cucumber and a big coconut.She will cut one full vessel of the vegetable and grate the whole coconut.Next 15 minutes she will be grinding the coconut in the Ammi ,that time itself the taste of the gravy seasoned in fresh coconut oil will make me more hungry.While grinding coconut she would have put the vegetables along with onion in the stove (viragu aduppu) so that when the grinding is over the vegetables would have cooked.she will make the gravy in a big vessel. That will be the only item made for lunch along with chutta papad.I have no words to explain the taste for the hungry stomach.The rice in Kerala will be big but no matter the the taste of the gravy overtook everything. So even today whenever I cook this My memories go back to those golden days.It is nearly 20 years I met her.she was in Bangalore that time.Since there was not much communication facilities like mobile phones or networking sites,we couldn't maintain our contacts.That is the usual case of people of our generation.Today you guys are blessed to have so much means to have contacts with your friends.I will be very happy if I can get her contacts back through this post.

Here is the recipe.I don't know whether it will tickle the taste buds of all like it did for me.But friends please give it a try and respond with your comments.
I have made it like koottu.she used to make it little watery like gravy.Anyway both will be aw some.
This vegetable is widely available.I have seen this poosanikkai cut into small portions and neatly wrapped in paper in Korean stores in US.

Ingredients
Possanikkai -cut pieces 2 cups
onion minced-1
Thick curd-1 tablespoon
small onion minced-10
coconut oil-2 table spoons
To grind
Cocunut grated -2 table spoons for koottu for gravy you can use even a full coconut depends on qty needed
cumin seeds-1 table spoon
green chili-4
Procedure
Cook the poosanikkai pieces in a kadai adding a cup of water, a teaspoon of turmeric powder,onion and little salt. Once the pieces are well cooked add the grounded paste.If you want it as gravy mix the grounded paste in two cups of water and add.Add the salt needed along with a table spoon of fresh coconut oil.let the gravy boil for 5 minutes. Add 1 or two table spoons of curd just before switching off. Switch off the stove.Now season the curry in a separate kadai .For seasoning in a table spoon of coconut oil add a teaspoon of cumin seeds(small jeera) and curry leaf.Pour it on top of the gravy.Don't mix it now.Mix while serving.
↧
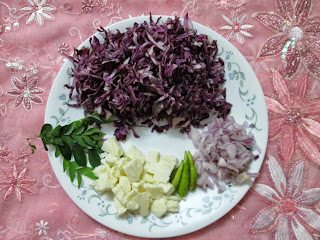
Red Cabbage Paneer Stir Fry (Sivappu muttai kose paneer poriyal)

Whatever may be the color of cabbage you choose to cook,you are not wrong.Both are very low in calories and high in fiber and nutrients.
But red cabbage has 10 times more vitamin A than the green one and it has double the iron than green cabbage
This recipe is the new found by chettinad cooks .In a marriage last month I happened to taste this curry and was impressed by its taste. The cook engaged for that wedding was one of the best chettinad cooks.I slowly enquired him what it was and its preparation.As we were the groom's people he couldn't refuse to tell. It is a simple recipe,the usual cabbage fry and instead of grated coconut paneer is added.But the smell of cabbage was not there in this recipe and it tasted different
Ingredients
Red cabbage minced -250 gms
big onion minced-1
green chili-4
paneer shredded-100 gms
Method
Wash the cabbage and keep aside.keep the kadai in the stove.In one table spoon of cooking oil season the fry with a teaspoon of mustard and urudh dhal along with little curry leaf.Add the minced onion and green chilies.Saute for a minute.Now add the washed cabbage.keep the fire in medium.The water in the washed cabbage will be enough for it to cook. Mix well and close the kadai. After five minutes check whether the pieces are cooked. If not add the salt needed and sprinkle some water and cook for three more minutes.Once it is cooked to your desired level add the shredded paneer and cook for two more minutes.
↧
Chettinad Egg Masala (Chettinad Muttai Masala)

Boiled eggs in any form is tempting for people of all ages. That too egg in a rich gravy,it will be really mouth watering. This Chettinad egg masala is very easy to cook even for bachelors as it does not require any grinding.
Now a days there is a mushrooming of Chettinad restaurants in all levels from five star to road side shops naming themselves as Chettinad. I am really proud that every one is fond of Chettinad food. My only concern is that people have a misconception about Chettinad food that it will be very spicy and will made of hand grinded masala.The truth is that Chettinad food will be very mild and with very little grinded masala.Chettinad achi as I have mentioned several times in my previous blogs that they don't use too much of anything.I have seen my mom,grand mom and the relatives of my elder generation taking 6 to 7 ladies finger,4 small onions,3 pods of Garlic and a very small tomato for a ladies finger sambar. The amount of thoor dhal they use will be one hand full.Another thing that I want to tell here that they use only one kuzhambu milagai thool for almost all veg and non veg curries. Coconut is very rarely used and when used also very little is used as they believe that too much of coconut will spoil the taste of the gravy.They don't use much oil too.It is the care and patience of their cooking makes the food delicious.
Last week we went to a famous chettinad restaurant in town and ordered for a Chettinad mushroom gravy.The gravy which was served was really mouth watering with oil on top and full of masala.since we are not used to so much of masala we couldn't finish the dish though we liked it. It was 8 pm that we had our dinner out there. By 12.30 I got up with some pain in the stomach and was lying in the bed thinking of what to do. With in ten minutes my husband also got up complaining of some burning sensation . The next two days was really bad for us.This incident really made me write this blog.Please dont use too much of spices and grinded masala thinking of making the gravy tasty as it is not good for the stomach.Be very careful while using oil too. Use oil in correct quantity.Too less oil also will make the dish taste less.
Coming to our egg masala it is very simple and easy and does not require too much of ingredients.9 out of 10 times we think of egg curry only when we run out of vegetables or when we want something fast.So this recipe will be handy that time.

Ingredients
Boiled egg. 4
Minced onion. 1
Tomato. 1
Chopped garlic. 4 to 5 pods
Kuzhambu milagai thool (sambar powder). 2 table spoons
Coriander powder 1 table spoon
Turmeric powder. 1/2 teaspoon
Curry leaves. Little
Coriander leaves to garnish

Procedure
Boil the eggs for 20 minutes with eggs immersed in water in a kettle.Let the eggs cool.once they are cold bring it under running water and peel off the shell.Cut the eggs into halves and keep aside.now for the gravy keep the kadai in the stove.In two table spoons of cooking oil season the gravy with a teaspoon of fennel seeds,3 small pieces of Cinnamon,2 cloves and few curry leaves.add the minced onions and a pinch of salt and saute for 2 minutes .Now add the tomatoes minced and saute for 2 minutes.when the tomatoes turn soft add the kuzhambu milagai thool,turmeric powder and coriander powder,salt required and mix in low fire.high flame will burn the powders,so be careful.once they are mixed add a cup of water and cook in medium flame for 10 minutes.when you feel that the gravy is in the desired consistency add the boiled eggs and cook for 3 more minutes. Make sure that there is enough gravy for the eggs to be inside the gravy.If you want gravy to be more ,double the onion and tomatoes and the masala powders. Before adding the eggs taste for salt and spice if found less add them. Finally garnish with coriander leaves.
This recipe will take only 30 minutes to cook as we can make the masala while we are boiling the eggs.
↧


